


The REPL
The quickest and easiest way to work on a Svelte app is through the REPL that Svelte has on their web site.
REPL : stands for Read, Evaluate, Print, Loop. This type of tool is very common to run programs without the need to go through all the steps of setting up an environment and deploying the program. If you've used CodePen, CodeSandbox or the Console in the Dev tools in a browser, you've used a REPL.
On the Svelte web site, click on the link REPL in the title bar. That will bring you to the REPL interface.
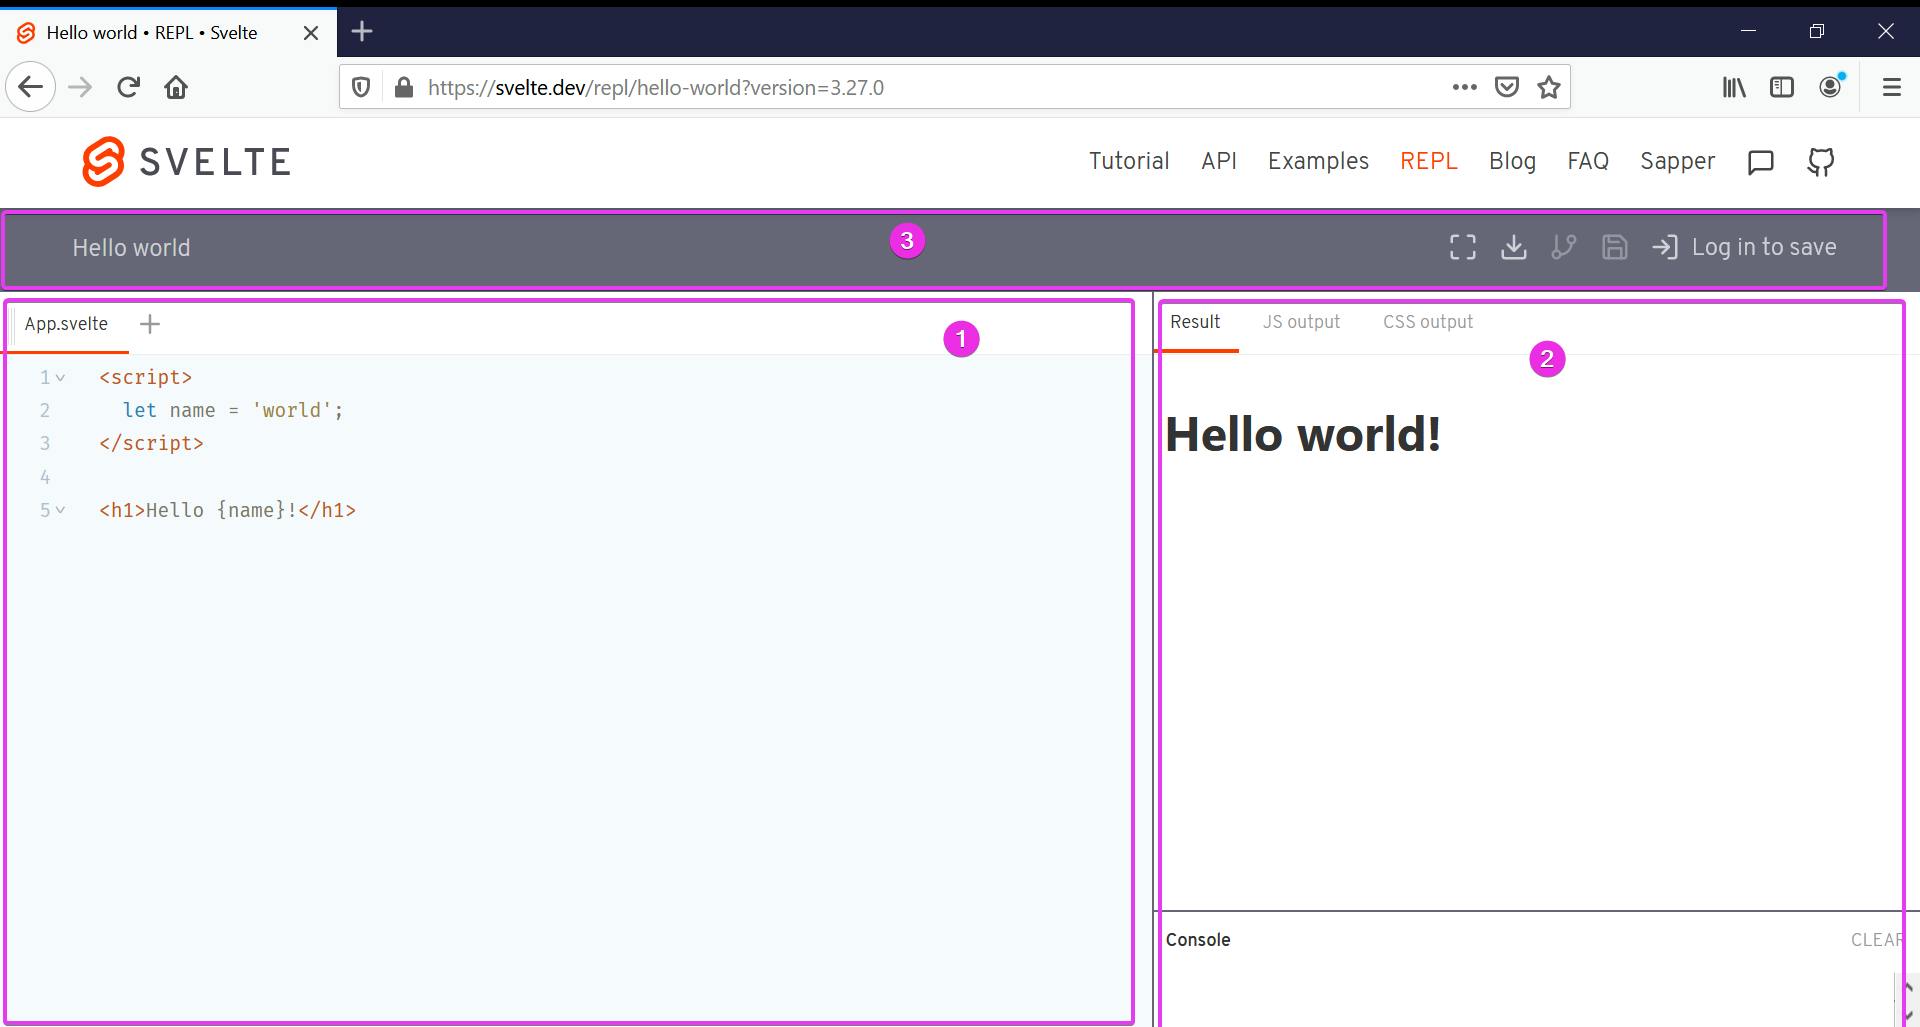
- On the left hand side is where the code that we'll be putting in goes.
- At the top is the name of the files, with a
+to create new files. The REPL starts withApp.svelte.
- At the top is the name of the files, with a
- Right hand side has three tabs
Resultis the output of the Svelte app. At the bottom is the console window for outputtingconsole.log()statements.JS outputis the JavaScript the Svelte complies the Svelte code down to. Also compiler options are listed on the bottom half.CSS outputis the CSS that Svelte complies the styles in the component down to.
- The grey bar has come general controls
- To the right is the name of the project, it default to
Hello World. Clicking on the words will allow editing. - The left starts with a square icon that puts the REPL as full screen
- Next is the download icon to download a zip file of the project.
- The next icon may not at first make sense, its to fork the project. Forking is creating a new project based on the current status of the project. This gives you the option to take each project in it's own direction. Or if you are looking at someone elses project it create a copy of the project in your account so your edits can be saved.
- And than the mysterious save icon (where did that icon design ever come from, we'll never know). Saving works exactly the way you'd think.
- The last part of the grey bar is determine by if you are logged in. Once you log in you can access the REPLs you've saved.
- To the right is the name of the project, it default to
Drawbacks of the REPL
There are a few drawbacks of using the REPL.
- Can't delete saved REPLs
- Can't sort, search or filter for a REPL
- Can't edit
src/main.jsorpublic/global.css
The last drawback limits some of the global styling and code we can write. There are ways around it and most likely you'll find plenty of work around for all of these drawbacks.
myFirstApp
The file App.svelte is already open and ready to go. We're going to replace all the code with the following.
<script>
    let meters = 0;
</script>

<h1>Converting App</h1>

<label for="meters">Meters</label>
<input id="meters" type="number" value={meters} />

<h1>
    {meters} meters is {meters * 3.2808399} feet
</h1>
The first thing you'll notice that we're putting the script tag and the HTML in the same file. If there was any CSS that would be placed in a style tag. The order of the three are up to you. It's very common to put them in JS - HTML - CSS order, JavaScript affects HTML and HTML is styled by CSS.
Svelte uses the {} curly braces to signify that a statement needs to be evaluated. For {meters} Svelte takes the value of meters and inserts it. Getting a little fancy with {meters * 3.2808399}.
The next thing you'll find is that while we can change meters in the code and it'll be outputted in each spot properly, we can't change meters using the input element. The reason is we've only set up a one-way binding.
Two way binding
There are a few ways of handling two-way binding. First the long way.
<input
    id="meters"
    type="number"
    on:input={(event) => meters = event.target.value}
    value={meters} />
The on: is telling Svelte that when the input event happens, do this.
The input event passes an event object and we're using this object to grab the value of the input element to store into the variable meters.
With the reactive nature of Svelte the user doesn't have to hit a button to get the action. The event of changing the input triggers Svelte to redo the calculation.
This works but that's a lot of code for something we'll be doing often. Svelte does have a shortcut; the bind: directive.
<input
    id="meters"
    type="number"
    bind:value={meters} />
Before we needed to specify the full name of value; event.target.value. Svelte will assume that that's the value you are trying to bind with.
Reactive assignments
It's normally frowned upon to put calculations or business logic into the HTML. Let's add a variable called feet and use that instead.
Change the script to:
<script>
    let meters = 0;
    let feet = meters * 3.2808399;
</script>
And the h1 element to:
<h1>
    {meters} is {feet} feet
</h1>
The meters part still works but the feet isn't reacting to the change. Svelte has a special syntax to flag that an expression need to be re-evaluated when certain values are updated. Change a variable's value on the right side of the assignment to trigger reevaluation.
$: feet = meters * 3.2808399;
You may notice I didn't use let anymore. By using the $: syntax, Svelte will automatically use let for you.
Please Note: The way that Svelte figures a value changed is by using the assignment operator. Some functions such as push and pop won't trigger the reactive component of Svelte.
Second Component
This is a simple app, no real need for to add a second component. But for demonstration purposes. We're going to move the some of the elements to a component.
Click the + next to the App.svelte tab. The REPL will set the name to Component.svelte and place the cursor over Component. Change the name to Result. The extension .svelte is the default and won't need to be changed unless you wanted it.
<script>
    export let meters = 0;
    export let feet = 0;
</script>

<h1>
    {meters} is {feet} feet
</h1>
The export lines tells Svelte that we are expecting those values when the component is declared. We'll be expecting two variables; meters and feet. Making them equal zero puts a default to their value in case a value wasn't provided.
The h1 is the same as what we had before.
To use this new component we go back to App.svelte.
Add to the top of the script tag:
import Results from './Results.svelte`;
At the bottom of the HTML section add: (remove the h1 tag that was there since the component will be used instead)
<Results meters={meters} feet={feet}/>
We are saying pass the value in meters into a variable called meters. There is a shorthand. If both have the same you don't have to say both.
<Results {meters} {feet}/>
Please note: these are considered props. They look and act a lot like attributes. Attributes are values on an HTML element. They will be numbers or strings. A prop on a Svelte component can be so much more. They can pass objects, array or even functions.
handling null
Something you might have noticed, if the input field is blank, you get null for the amount of meters. That's not good user experience. There are a couple of ways we can adjust it.
First method we'll look at is during the calculation of the feet.
Change the feet calculation to be:
$: feet = (meters == null) ? 0 : meters * 3.2808399;
Using a ternary operation to check if meters is null and either set feet to zero or do the calculation as before.
Next option we'll look at is inside the component. Using the same type of ternary operation, we'll exchange the null for a zero.
<h1>
    {(meters == null ? 0 : meters)} meters is {feet} feet
</h1>
As with most things dealing with coding, the style you choose is up to you and your teammates.
This second component could be made more general. Instead of using meters and feet use value1 and value2. For example:
<script>
    export let value1 = 0;
    export let label1 = '';
    export let value2 = 0;
    export let label2 = '';
</script>

<h1>
    {value1} {label1} is {value2.toFixed(2)} {label2}
</h1>
We'd also need to change the component call:
<Results value1={meters} label1="meters" value2={feet} label2="feet"/>
In this case since the component calls it value1 we can't use the shorthand.
Styling a component
At this point you might be wondering why we'd break off such a small piece of code into a component. As it sits, most likely you wouldn't. But there is a styling advantage to splitting off such a small piece. Let's say we are reusing this many times in different places in the app. We could add all the styling into component and anywhere we use it, it would be styled the same way without interfering with other component's styles.
Add these styles to the Results.svelte component. Notice only the h1 tag inside the Results component changed color.
<style>
    h1 {
        color: #45ef99;
    }
</style>
One popular feature being added to apps is a dark mode. Since each components styles itself separate from each other, how can we get all the components to go to dark mode? We'll pass a mode value.
Add the following to the script area in the Results component:
export let mode = '';
The default will be no mode.
Now in the opening h1 tag:
<h1 class='{mode}'>
And in the styling area, add this style rule:
    .dark {
        background-color: #111;
        color: #eee;
    }
Over in App.svelte, modify the Results call by adding mode="dark".
<Results value1={meters} label1="meters" value2={feet} label2="feet" mode="dark"/>
Exporting to a local Dev Environment
We've put a lot of work in creating this converting app. Maybe we'd want to move it to our local machine.
Please note: you will need Node to run the Svelte app on the local machine.
Click on the download button located on the grey app bar, it's a downward arrow. Once the zip file has been downloaded, extract the files into a folder.
Firth the Node Modules needed for Svelte need to be installed, run the following from a command line (or terminal, or bash shell) inside the folder with the extracted files:
npm install
The node modules only have to be installed once. Unless updates happened to the modules and you want to update them.
Running the Svelte app is done by:
npm run dev
Have a look through the text that comes up. If there are any errors, they'll show up. At the end the location to browse to in the browser will come up. The default location to point the browser is localhost:5000.
Onward
Challenge yourself by adding more conversions. Maybe add a new styling that can be triggered via a prop to the Results component.
For me I'm continuing on with Svelte and will be back soon with another taste of Svelte. See you then....
Resources
Svelte Homepage